Category
- Products
- FAQ
- Contact us

Frequency inverter manufacturers
Home » 50/60 400Hz Converter » Frequency Converter 50Hz to 60Hz Design
Frequency Converter 50Hz to 60Hz Design
In reality very few devices today are frequency-dependent and many have changing power supplies which can be connected to a wide range of voltages. If only voltage is the issue then a transformer will solve the problem but there are still some devices which require a certain line frequency and frequency is much more complicated to change.  A friend has a shaver which resonates mechanically with the 60Hz line frequency and will not work well at 50Hz. (I still have and use daily a BRAUN shaver from about 1967 which resonates at 50 Hz and will not work well at 60 Hz even though the voltage can be changed from single phase 110V to 220 V. I have another, newer shaver which does not depend on frequency for when I travel abroad.) Even motors which will work at 50 Hz by rotating slower need to have the voltage adjusted downwards due to the lower impedance at 50Hz so sometimes it makes sense to provide the right frequency even if not strictly necessary.
It is easy to convert voltage using a transformer or maybe a switching adapter but it is not so easy to change frequency. After some search I found there exist solid frequency converters but they are very expensive professional equipment, not gadgets for the traveler and home appliances, so I set out to design and build a cheaper one myself.
The specs are:
Input: 230 Volt AC, 48 Hertz to 400 Hertz.
Output: 110 Volt RMS ac (modified sine wave), 60 Hertz.
The power this frequency converter can output depends mainly on the value of C1 and C2; the larger they are, the greater the output. The transistors are oversized for this low power application and could handle much more power supposing they are mounted on an adequate heat sink and the control section would not be affected at all. As this circuit outputs 110 V RMS it can be used as a voltage converter even if the device does not require 60Hz and would work with 50 Hz but in this case a transformer is really a better solution.
Caution! This frequency converter circuit handles extremely high and dangerous voltages. Do not even think of building it unless you have the necessary knowledge and expertise. This is not a recipe to be followed blindly but an example of a general idea to be developed to suit individual needs. If you are not experienced then don't even try.
Inverter Section
We can divide the frequency converter into three distinct parts. One is the switching part (inverter) which outputs the 110V RMS rectangular wave, another is the control section which controls the switching and the third is the low voltage power supply for the control section. Let's first have a quick look at the different sections beginning with the switching inverter section.
C1 and C2 are charged in series from the single phase 230 V mains through the diode bridge to a total of about 320 V which is divided equally among both of them. There is no power factor correction so this design is really only suitable for relatively small loads. A couple of resistors of equal value in parallel with C1 and C2 assure the voltage is distributed equally among both capacitors. I happened to have 330K but I probably would have chosen a somewhat lower value like 100 K. An NTC limits the inrush current. I also added a fuse to the inverter section which is not shown in the diagram at the line input. This is common sense and the only protection against overloads.
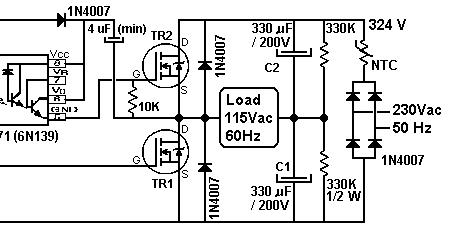
The load is connected on one end to the middle point of C1 and C2 and the other end is alternatively switched between the high and low rails by the half bridge formed by TR1 and TR2. A reverse-biased 1N4007 diode is shown in parallel with each of TR1 and TR2. This is to protect from transients due to inductive loads. In fact I did not install them because the MOSFETs IRF830 have this diode included in the case. I mounted the pair of transistors on a radiator although with the reduced load they hardly warm up but the inverter circuit could be upgraded to handle greater power by just increasing the value of C1 and C2 and transistor heat would not be a problem. This is the good part of working at a low frequency such as 50 Hz, 60 Hz.
In order to keep the peak and RMS values of the output equal to a 110 Vac RMS sine wave we need to have the output be:
1/4 cycle = 0 V (both transistors blocked),
1/4 cycle = +160 V (TR2 conducts),
1/4 cycle = 0 V (both transistors blocked),
1/4 cycle = -160 V (TR1 conducts),
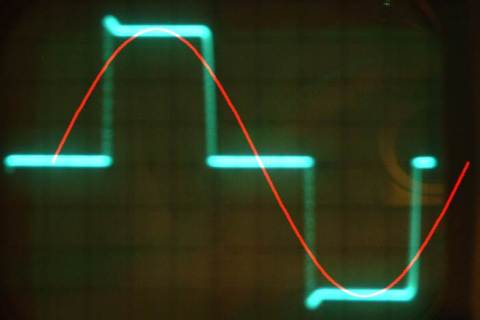
It can be mathematically shown that this wave shape has the same RMS and peak values as a 110V ac sine wave. Peak value is important for devices which charge capacitors to peak value and RMS is important for other devices. For this reason this waveform is the best rectangular approximation to a sine wave and is commonly called "modified sine wave". I, personally, dislike this marketing term because it is quite inaccurate. Rectangular wave or "modified square wave" would be more accurate. Some devices might require true sine wave from the frequency converter. Many voltmeters measure average volts and correct by a factor of 0.707/0.636 to indicate RMS which assumes a sine waveform and will not be valid for other waveforms. Such an instrument when measuring a rectangular "modified sine wave" like this one will under-indicate by a factor of 0.5/0.636 and so the readings would have to be multiplied by 0.636/0.5 = 1.272 to find the true measurement.
In the following photo we can see the actual rectangular output (green) as seen on a 'scope and a mathematical sine wave (red) superimposed. Actual voltage from the mains have the top very much clipped due to all the rectifier-capacitor loads.
So, we need two signals which will switch TR1 and TR2 on/off at the appropriate times. TR1 (called "low side") is easy to control because the source is at the same base reference level as the controlling circuit but TR2 (called "high side") is a bit more tricky because it is floating and goes all the way between both rails. There are many ways to solve the problem of translating the level of the control signal. You can search for "high-side control" or similar terms. There are many discrete circuits and integrated solutions. I considered using a IRS2110 for simplicity but it was relatively expensive and difficult to find so I decided to go with my own discrete solution using an old optocoupler which I already had. The design is extremely simple and works well at 60 Hz but would not be suitable for high switching frequencies because TR2 delays in switching off and the circuit would have to be altered to make it switch off faster (which would not be complicated to do). This is because the gate discharges through the capacitor rather than having a signal forcing it down. Change the value of the resistor speeds up the switch-off time but requires higher current while the transistor is turned on.
Special attention needs to be given to understanding the bootstrap capacitor which provides polarization for switching the high side MOSFET TR2. This capacitor is charged to 15 V through the diode, from the low voltage power supply which supplies the control section when TR1 is conducting and brings the capacitor to ground level. Then, when TR1 stops conducting the capacitor floats up with the source of TR2 providing the necessary voltage for the switching of the gate through the optocoupler (or whatever circuit is used in other cases). I actually used 47 uF which is more than enough.
Control Section
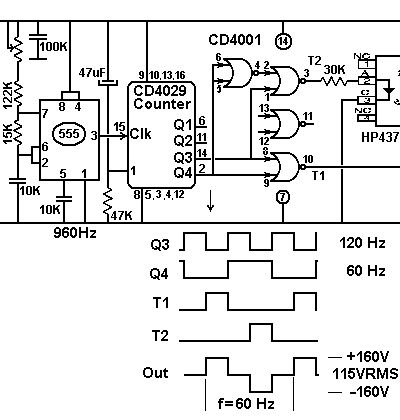
Let us look now at the frequency converter control section. It is formed by a classic 555 oscillator oscillating at 960 Hz, a four stage CD4029 divider (divides by 16) and three NOR gates of a CD4001. The waveforms shown are self-explanatory. It can be seen how T1 and T2 are alternatively positive for 1/4 cycle. T2 is applied to the optocoupler which shifts the level to that of TR2. There is a fourth, unused gate in the 4001 and it is good practice to connect the inputs to either ground or Vcc rather than leave them floating. I also placed a bypass capacitor between the power supply pins.
Pin 1 of the 4029 counter pre-loads a value set at pins 4, 12, 13, 3 into Q1-Q4 when connected to Vcc and the counter counts normally when connected to ground. This means we can stop the output by pulling it high. With the resistor and capacitor as shown the inverter output will take about a second to start working after the power is applied. I used this to the frequency converter at first but I later removed the capacitor to speed up my testing and I never replaced it. You can use it or not or use a switch depending on your needs. It could also be used to implement an overload protection with a circuit that drives it high when it detects an overcurrent at the output.
Power Supply
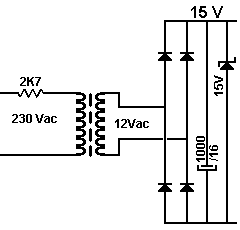
Finally we have the 15 Volt power supply for the frequency converter control section. I have not measured the consumption but I imagine it might be something like 10 or 15 mA. We need about 15 V for the switching of the MOSFETs and the control circuit ICs will also work well at this voltage. For such small consumption, rather than complicated regulator circuits, I always go for a very simple design as illustrated here. I just put a zener diode in parallel with the load and make sure the transformer has enough output resistance so the zener will not be overloaded. If I am designing a commercial product I can specify a transformer with the desired output resistance and this also helps reduce the cost as the smallest possible transformer is being used. But if I am using a recycled transformer taken from my junk box, as in this case, then I just put a resistor in series with the primary and I try several values until the resistor by itself is reducing the current to just a bit over what the circuit needs and the small excess is absorbed by the zener diode. You can't get much simpler than that. Note that the zener only conducts briefly during the ac input peaks. Also note that the resistor needs to be sized individually for each transformer and each circuit by testing. Transformers with the same nominal output values vary wildly in their actual open-circuit voltage and in their output impedance so you have to test for yourself. You can start with a large resistor value and decrease it gradually until you get the output voltage you need.
Construction
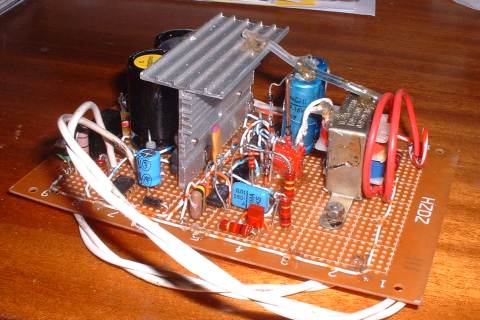
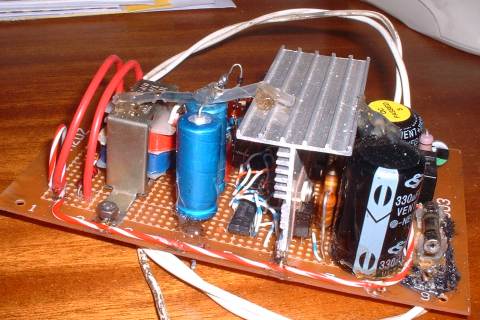
I assembled the frequency converter circuit on perfboard as I designed it and tinkered with it until it worked quite well. With a resistive load it worked perfectly but when I connected an inductive load there was a problem because each time a transistor would cut off the opposite one would turn on instantly for a brief moment. Rather than trying to modify the circuit I solved this problem by putting a capacitor in parallel with the load and a small resistor in series with both. It is possible that an RC snubber in parallel with each transistor would have resolved the issue.
Besides of designing by yourself, you can simply buy a GoHz frequency converter to
Convert single phase
110V 60Hz to 220V 50Hz;
120V 60Hz to 240V 50Hz;
230V 50Hz to 110V 60Hz;
...
Convert three phase
480V 60Hz to 400V 50Hz;
240V 60Hz to 440V 50Hz;
... ...
Or custom your specific requirements.
 A friend has a shaver which resonates mechanically with the 60Hz line frequency and will not work well at 50Hz. (I still have and use daily a BRAUN shaver from about 1967 which resonates at 50 Hz and will not work well at 60 Hz even though the voltage can be changed from single phase 110V to 220 V. I have another, newer shaver which does not depend on frequency for when I travel abroad.) Even motors which will work at 50 Hz by rotating slower need to have the voltage adjusted downwards due to the lower impedance at 50Hz so sometimes it makes sense to provide the right frequency even if not strictly necessary.
 It is easy to convert voltage using a transformer or maybe a switching adapter but it is not so easy to change frequency. After some search I found there exist solid frequency converters but they are very expensive professional equipment, not gadgets for the traveler and home appliances, so I set out to design and build a cheaper one myself.
The specs are:
Input: 230 Volt AC, 48 Hertz to 400 Hertz.
Output: 110 Volt RMS ac (modified sine wave), 60 Hertz.
The power this frequency converter can output depends mainly on the value of C1 and C2; the larger they are, the greater the output. The transistors are oversized for this low power application and could handle much more power supposing they are mounted on an adequate heat sink and the control section would not be affected at all. As this circuit outputs 110 V RMS it can be used as a voltage converter even if the device does not require 60Hz and would work with 50 Hz but in this case a transformer is really a better solution.
Caution! This frequency converter circuit handles extremely high and dangerous voltages. Do not even think of building it unless you have the necessary knowledge and expertise. This is not a recipe to be followed blindly but an example of a general idea to be developed to suit individual needs. If you are not experienced then don't even try.
Inverter Section
We can divide the frequency converter into three distinct parts. One is the switching part (inverter) which outputs the 110V RMS rectangular wave, another is the control section which controls the switching and the third is the low voltage power supply for the control section. Let's first have a quick look at the different sections beginning with the switching inverter section.
C1 and C2 are charged in series from the single phase 230 V mains through the diode bridge to a total of about 320 V which is divided equally among both of them. There is no power factor correction so this design is really only suitable for relatively small loads. A couple of resistors of equal value in parallel with C1 and C2 assure the voltage is distributed equally among both capacitors. I happened to have 330K but I probably would have chosen a somewhat lower value like 100 K. An NTC limits the inrush current. I also added a fuse to the inverter section which is not shown in the diagram at the line input. This is common sense and the only protection against overloads.

The load is connected on one end to the middle point of C1 and C2 and the other end is alternatively switched between the high and low rails by the half bridge formed by TR1 and TR2. A reverse-biased 1N4007 diode is shown in parallel with each of TR1 and TR2. This is to protect from transients due to inductive loads. In fact I did not install them because the MOSFETs IRF830 have this diode included in the case. I mounted the pair of transistors on a radiator although with the reduced load they hardly warm up but the inverter circuit could be upgraded to handle greater power by just increasing the value of C1 and C2 and transistor heat would not be a problem. This is the good part of working at a low frequency such as 50 Hz, 60 Hz.
In order to keep the peak and RMS values of the output equal to a 110 Vac RMS sine wave we need to have the output be:
1/4 cycle = 0 V (both transistors blocked),
1/4 cycle = +160 V (TR2 conducts),
1/4 cycle = 0 V (both transistors blocked),
1/4 cycle = -160 V (TR1 conducts),
It can be mathematically shown that this wave shape has the same RMS and peak values as a 110V ac sine wave. Peak value is important for devices which charge capacitors to peak value and RMS is important for other devices. For this reason this waveform is the best rectangular approximation to a sine wave and is commonly called "modified sine wave". I, personally, dislike this marketing term because it is quite inaccurate. Rectangular wave or "modified square wave" would be more accurate. Some devices might require true sine wave from the frequency converter. Many voltmeters measure average volts and correct by a factor of 0.707/0.636 to indicate RMS which assumes a sine waveform and will not be valid for other waveforms. Such an instrument when measuring a rectangular "modified sine wave" like this one will under-indicate by a factor of 0.5/0.636 and so the readings would have to be multiplied by 0.636/0.5 = 1.272 to find the true measurement.
| Waveform | True sine | Modified Sine |
| Peak | 1.000 | 1.000 |
| Average | 0.636 | 0.500 |
| RMS | 0.707 | 0.707 |
In the following photo we can see the actual rectangular output (green) as seen on a 'scope and a mathematical sine wave (red) superimposed. Actual voltage from the mains have the top very much clipped due to all the rectifier-capacitor loads.

So, we need two signals which will switch TR1 and TR2 on/off at the appropriate times. TR1 (called "low side") is easy to control because the source is at the same base reference level as the controlling circuit but TR2 (called "high side") is a bit more tricky because it is floating and goes all the way between both rails. There are many ways to solve the problem of translating the level of the control signal. You can search for "high-side control" or similar terms. There are many discrete circuits and integrated solutions. I considered using a IRS2110 for simplicity but it was relatively expensive and difficult to find so I decided to go with my own discrete solution using an old optocoupler which I already had. The design is extremely simple and works well at 60 Hz but would not be suitable for high switching frequencies because TR2 delays in switching off and the circuit would have to be altered to make it switch off faster (which would not be complicated to do). This is because the gate discharges through the capacitor rather than having a signal forcing it down. Change the value of the resistor speeds up the switch-off time but requires higher current while the transistor is turned on.
Special attention needs to be given to understanding the bootstrap capacitor which provides polarization for switching the high side MOSFET TR2. This capacitor is charged to 15 V through the diode, from the low voltage power supply which supplies the control section when TR1 is conducting and brings the capacitor to ground level. Then, when TR1 stops conducting the capacitor floats up with the source of TR2 providing the necessary voltage for the switching of the gate through the optocoupler (or whatever circuit is used in other cases). I actually used 47 uF which is more than enough.
Control Section
Let us look now at the frequency converter control section. It is formed by a classic 555 oscillator oscillating at 960 Hz, a four stage CD4029 divider (divides by 16) and three NOR gates of a CD4001. The waveforms shown are self-explanatory. It can be seen how T1 and T2 are alternatively positive for 1/4 cycle. T2 is applied to the optocoupler which shifts the level to that of TR2. There is a fourth, unused gate in the 4001 and it is good practice to connect the inputs to either ground or Vcc rather than leave them floating. I also placed a bypass capacitor between the power supply pins.
Pin 1 of the 4029 counter pre-loads a value set at pins 4, 12, 13, 3 into Q1-Q4 when connected to Vcc and the counter counts normally when connected to ground. This means we can stop the output by pulling it high. With the resistor and capacitor as shown the inverter output will take about a second to start working after the power is applied. I used this to the frequency converter at first but I later removed the capacitor to speed up my testing and I never replaced it. You can use it or not or use a switch depending on your needs. It could also be used to implement an overload protection with a circuit that drives it high when it detects an overcurrent at the output.

Power Supply
Finally we have the 15 Volt power supply for the frequency converter control section. I have not measured the consumption but I imagine it might be something like 10 or 15 mA. We need about 15 V for the switching of the MOSFETs and the control circuit ICs will also work well at this voltage. For such small consumption, rather than complicated regulator circuits, I always go for a very simple design as illustrated here. I just put a zener diode in parallel with the load and make sure the transformer has enough output resistance so the zener will not be overloaded. If I am designing a commercial product I can specify a transformer with the desired output resistance and this also helps reduce the cost as the smallest possible transformer is being used. But if I am using a recycled transformer taken from my junk box, as in this case, then I just put a resistor in series with the primary and I try several values until the resistor by itself is reducing the current to just a bit over what the circuit needs and the small excess is absorbed by the zener diode. You can't get much simpler than that. Note that the zener only conducts briefly during the ac input peaks. Also note that the resistor needs to be sized individually for each transformer and each circuit by testing. Transformers with the same nominal output values vary wildly in their actual open-circuit voltage and in their output impedance so you have to test for yourself. You can start with a large resistor value and decrease it gradually until you get the output voltage you need.

Construction
I assembled the frequency converter circuit on perfboard as I designed it and tinkered with it until it worked quite well. With a resistive load it worked perfectly but when I connected an inductive load there was a problem because each time a transistor would cut off the opposite one would turn on instantly for a brief moment. Rather than trying to modify the circuit I solved this problem by putting a capacitor in parallel with the load and a small resistor in series with both. It is possible that an RC snubber in parallel with each transistor would have resolved the issue.


Besides of designing by yourself, you can simply buy a GoHz frequency converter to
Convert single phase
110V 60Hz to 220V 50Hz;
120V 60Hz to 240V 50Hz;
230V 50Hz to 110V 60Hz;
...
Convert three phase
480V 60Hz to 400V 50Hz;
240V 60Hz to 440V 50Hz;
... ...
Or custom your specific requirements.
I just want to do the opposite thing: convert 60Hz to 50Hz 220V
Excellent, I'm going to do one for the turntable of my seeburg jukebox.
normally, I'ts run at 45RPM in 60hZ
BUT I'M FRENCH (50Hz in france)
many thanks, best regards.
normally, I'ts run at 45RPM in 60hZ
BUT I'M FRENCH (50Hz in france)
many thanks, best regards.
I tried this circuit. It burnt into flames. I don't know why.
Hello. I am wondering if I can build a device to run a european washing machine we just shipped in to the USA. I is a 230v/50hz 2200 max volt output. Can I make such a unit that will run this set up. I purchase a voltage transformer but the Hz are still incorrect at 60Hz and it will not run the washer unless I convert to 50Hz.
Is this frequency converter available ?
Input: 100VAC 50Hz
Output: 120VAC 60Hz (+ - fine tuning)
1kVA
For hooking up with Hammond tone-wheel organs with synchronous motor.
Input: 100VAC 50Hz
Output: 120VAC 60Hz (+ - fine tuning)
1kVA
For hooking up with Hammond tone-wheel organs with synchronous motor.
I also looking for device to convert 60hz to 50 hz for my European tape recorders
110v or 220v
110v or 220v
Almost get electricouted using this information. Not sure why smoked and burned
Looking for frequency converter (inverter) from 50 to 60 Hz.
For the time being it is used a autotransformer 220->110 VAC/50Hz. The absorbing power is less than 400 Watts (normally operates at 175 W)
For the time being it is used a autotransformer 220->110 VAC/50Hz. The absorbing power is less than 400 Watts (normally operates at 175 W)
Good day.
I hope you can help me. I have two European appliances, washing machine and dishwasher,which I brought to Peru.
The two appliances have presented the same problem, they will not perform the draining.The commands have gone haywire.
Being Peru 220v/60hz, it seems that the frequency difference has provoked a problem.
I would like to know if I can have the machines repaired, and if I could find a frequency converter. I know they are expensive, but have no idea of the costs.
I will greatly appreciate your advice.
Best wishes
how about AC 220v/50hz gona use for power AC 220v/60hz ?
Hello I am trying to install a Chinese made range hood, the fan has 2 speeds and a light. 220/ 50 Hz is on the unit. Is this possible for me to safely utilize this unit in the US
can someone please advise me on the following,i have a pool pump which is 240v, 50hz, can i run this without a frequency converter, on 220v 60hz, without to many problems thanks
How if my washing machine is 220v-240v 50hz... i will use it to 220v-240v 60hz...what is possible it happen?
Are there any converters like...
127V/220V 60Hz to 230V 50Hz
110V - 240V 60Hz to 230V 50Hz
220V - 240V 60Hz to 230V 50Hz
110V - 240V 60Hz to 230V 50Hz
100V - 127V 50Hz to 115V 60Hz
127V/220V 60Hz to 230V 50Hz
110V - 240V 60Hz to 230V 50Hz
220V - 240V 60Hz to 230V 50Hz
110V - 240V 60Hz to 230V 50Hz
100V - 127V 50Hz to 115V 60Hz
230V 50Hz to 110V 60Hz;
Your diagram is not completed, This has be done on purpose?
hi,
i am looking for frequency converter for 230VAC 50Hz to 230VAC 60Hz.
i am looking for frequency converter for 230VAC 50Hz to 230VAC 60Hz.
I want to take my computers that I purchased in Europe back to the US.
For example if I simply buy a good converter take the US power supply which is 120 volts at 60Hz up to 220 volts (which will also be at 60Hz) will they work ? Or do I need to get an inverted as well to bring the Hz down to 50 ?
Very many thanks !
For example if I simply buy a good converter take the US power supply which is 120 volts at 60Hz up to 220 volts (which will also be at 60Hz) will they work ? Or do I need to get an inverted as well to bring the Hz down to 50 ?
Very many thanks !
My requirement- 220 volts x 50 hz, 3 sets of transmitter @ 60 watts each
Local electricity has 220 volts at 60Hz.
Local electricity has 220 volts at 60Hz.
Hello, 2 questions! I need to know if I can operate a steam machine that works at input of 220V - 50Hz, 2800W; I'll connect it to a gasoline generator that operate at 220V but 60Hz, need to know if I can operate the steamer to at least know if it works, and what frequency converter do you suggest me? Thanks in advance!
can you please tell me 48v 50hz AC to 24v 80khz AC
how to change frequency from 50hz to 60hz by mathmetically
What is available on the market for small converter 50 to 60 hz to just run a US clock?
Thanks for your help
Thanks for your help
I have a Samsung dryer 120 to 240 v 60hz I need trun on 50 hz
hi,
i am looking for frequency converter for 220VAC 50Hz to 220VAC 60Hz.
i am looking for frequency converter for 220VAC 50Hz to 220VAC 60Hz.
Post a Comment:
You may also like:

